To make the most of our hard-earned clicks—whether from organic search, paid ads, or social media—we need to ensure that visitors don’t just bounce and disappear. The goal is to build high-converting demand generation experiences that guide users along the journey from curious clicker to sales-ready lead.
Companies that excel at lead nurturing are able to generate 50% more sales-ready leads at 33% lower cost per lead.
Lori Wizdo, VP Principal Analyst, Forrester
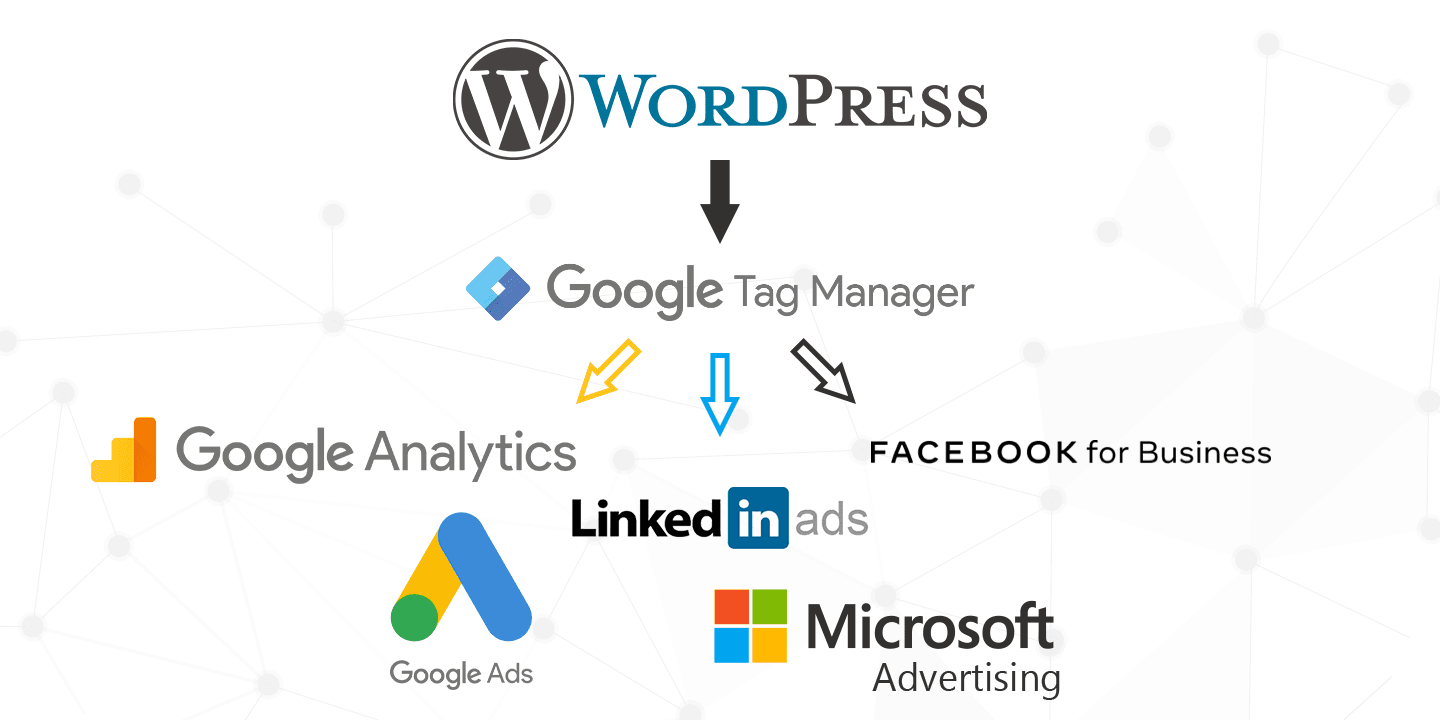
This blog post shows you how to create a scalable remarketing engine by combining:
- WordPress Post Categories
- Google Analytics 4 (GA4) Content Groupings
- Google Tag Manager (GTM)
- Remarketing Lists for Search Ads (RLSA)
- Dynamic remarketing on Google, LinkedIn, Facebook, and Instagram
And best of all? Once it’s set up, it runs automatically. New content gets slotted into the right audience segment without lifting a finger—and URL changes don’t break anything.
Step 1: Organize Your Content by Category in WordPress
The foundation of this approach is categorization. Each blog post should be assigned to one or more WordPress Post Categories that reflect the topic or theme—think “Email Marketing,” “SaaS Analytics,” or “Leadership.”
These categories will become the basis for our content groupings in GA4.
✅ Pro Tip: Don’t overdo the number of categories. Keep them broad and meaningful to avoid fragmentation.
Step 2: Capture Category Data Using Google Tag Manager
In GTM, you’ll need to pull the WordPress category into a custom dimension. You can usually access this via the pageCategory or a similar variable on your site. If not, you may need to write a small JavaScript snippet to extract it from the DOM.
Set up a custom JavaScript variable in GTM:
function() {
  var el = document.querySelector('.post-category-class'); // Update with the actual selector
  return el ? el.textContent.trim() : 'uncategorized';
}
Next, add this as a parameter in your GA4 tag so that it gets sent on every pageview.
Step 3: Create a Custom Dimension and Content Grouping in GA4
Now that the category is being sent to GA4, head into your GA4 property and:
- Navigate to Admin > Custom Definitions > Create Custom Dimension
- Name it something like
Content Category - Set the scope to Event
- Use the same parameter name from GTM (e.g.,
content_category)
Then, go to Reports > Library > Content Groupings and create a new grouping based on your new custom dimension.
Step 4: Build Remarketing Audiences in GA4
This is where the magic happens. With your content grouped, you can now create audiences based on interest or behavior:
- Users who visited “Email Marketing” content
- Visitors who engaged with “Risk Management” posts
- Readers who viewed at least 3 articles from “Product Strategy”
To do this:
- Go to Admin > Audiences > New Audience
- Use your custom dimension (
content_category) as the filter - Choose additional behavior-based filters like
session_duration > 60sorengaged_session = trueif needed
These audiences can now be linked to your Google Ads account for RLSA, dynamic remarketing, or performance campaigns.
Step 5: Extend to Other Channels
Once your audiences are defined in GA4, you can sync them across channels:
- Google Ads: For search ads, display remarketing, and YouTube
- Facebook & Instagram: Use UTM parameters and category-based engagement to build lookalike audiences
- LinkedIn: Upload audience segments by exporting category data if needed
This cross-channel remarketing strategy keeps your funnel active—ensuring that warm traffic gets the right follow-up message, in the right context, on the right platform.
This strategy brings structure to your content strategy and precision to your advertising spend. Rather than casting a wide net, you’re catching the right fish—those who’ve already shown interest and are more likely to convert.
Remarketing isn’t just for abandoned carts. It’s for re-engaging high-intent visitors with relevant offers, insights, or opportunities to take the next step. And with WordPress + GA4 + GTM, the system basically runs itself.